
Topaz Video AI is currently considered one of the most advanced all-in-one solutions for video upscaling, quality enhancement, and smooth slow motion. The program combines a dozen specialized AI models and makes it possible to achieve a noticeably cleaner and sharper image from SD, HD, and even 4K sources.
However, it is important to remember that Topaz does not turn technically poor footage into material comparable to professional cinema camera footage. It enhances what is already there rather than creating details out of thin air.
- 🎛Navigation
- 💥 Step-by-step guide to using Topaz AI
- How to quickly choose the right model for video processing
🎛Navigation
🏠 Main Menu > 🎬 Video of the future > 💠 Topaz AI


💥 Step-by-step guide to using Topaz AI
Model Settings
Before uploading a video, make sure the correct settings are selected and match the requirements for the upcoming generation process.
Topaz Settings
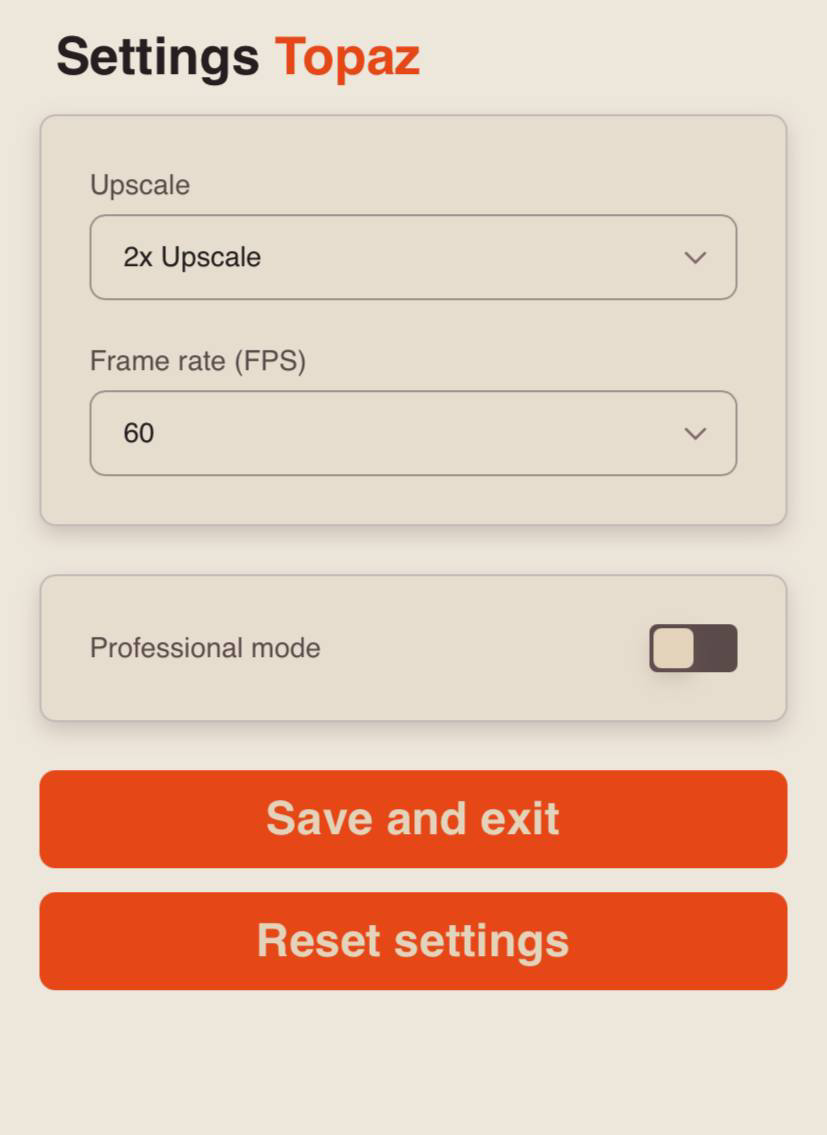
Upscale
Selecting the Original Upscale option will not change the video resolution. When this feature is enabled, only video detail enhancement will be applied, without altering the original frame size.
Video upscaling ×2 and ×4 are methods of improving video clarity by increasing its resolution and dimensions.
×2 upscale means that the width and height of the video are doubled. For example, a video with a resolution of 640×360 px will become 1280×720 px (HD) after ×2 upscaling.
×4 upscale means that the width and height of the video are increased four times compared to the original size. For example, a 320×240 px video will become 1280×960 px after ×4 upscaling.
❗️Important:
- 720p (HD), 1080p (Full HD), and 2K resolutions can only be upscaled by ×2.
- 480p and lower resolutions can be upscaled by either ×2 or ×4.
Frame Rate (FPS)
Frame rate, or FPS, is the number of frames/images displayed per second. The higher the FPS, the smoother the video appears.
For example:
24 FPS - the standard for cinema and films; the image has a slightly “cinematic” look with moderate smoothness.
25 FPS - the standard for TV broadcasting.
30 FPS - the standard for TV and online video; regular smoothness.
45 FPS - rarely used; an intermediate frame rate.
50 FPS - used in TV broadcasting for sports or fast-moving action with smoother motion.
60 FPS - commonly used in gaming, sports broadcasts, and action videos with very smooth motion.
❗️Important:
Frame rates above 30 FPS may slow down your video by ×1.5 or ×2.
Why do some videos use 25 frames per second while others use 30?
Historically, different countries adopted different video frame rates, primarily because of their power grid standards.
Europe and many other countries (PAL) - 25 FPS
To prevent flickering on TV screens, video was recorded at 25 FPS, which matched the local electrical frequency.
USA, Canada, Japan, and others (NTSC) - 30 FPS
In these countries, video was recorded at 30 FPS to ensure smooth playback without flickering.
Can previously recorded videos be converted?
Yes. Topaz Video AI can help convert videos from 25 FPS to 30 FPS and vice versa, although the quality may sometimes be slightly affected during the process.
Advanced settings
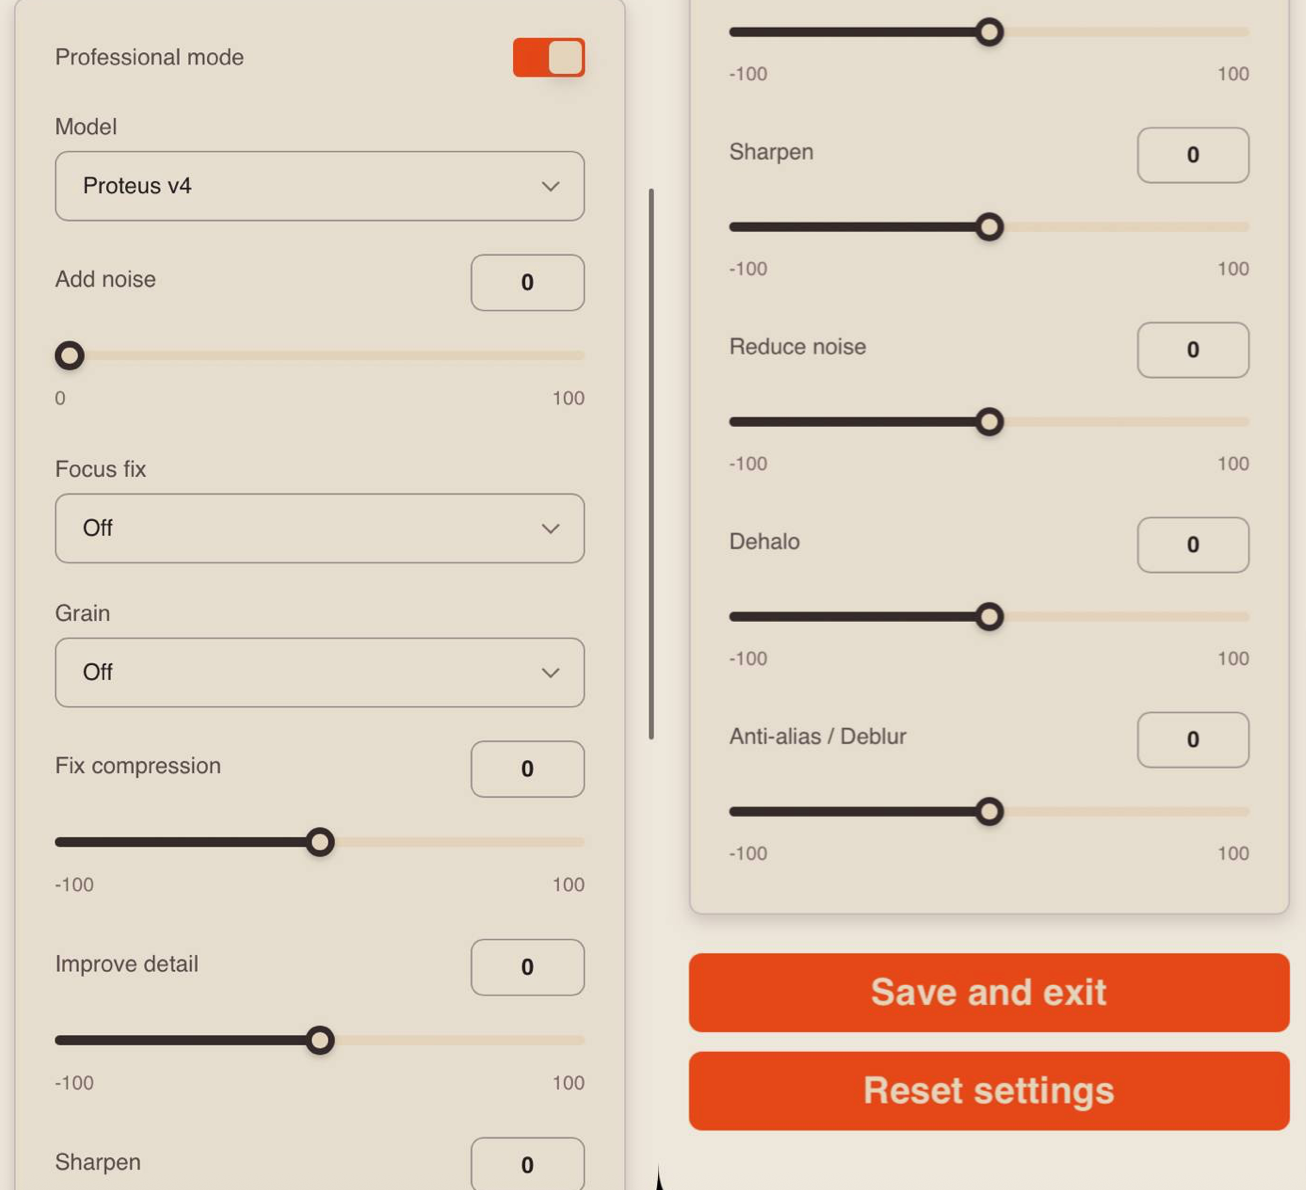
Model
Each model works using different algorithms. Below is a brief overview of how each one works.
Artemis Aliased & Moire / Artemis High Quality / Artemis Low Quality / Artemis Strong Dehalo / Artemis Medium Quality
These universal models are suitable for fast and reliable upscaling or quality enhancement. The model automatically balances frame cleanup and sharpening while adapting to the source material.
High Quality — recommended for videos with minimal distortion and high-quality source footage.
Medium Quality — optimal for videos with moderate compression or minor artifacts.
Low Quality — used for videos with noticeable noise, blocking, or blurriness.
Artemis Dehalo — used to remove unwanted bright halos around objects in the image. Selecting this model separately is not required, as the halo removal feature is available in the professional settings.
- Dione Interlaced DV
This model is specifically designed to improve the quality of digital video recordings captured from formats such as DV, MiniDV, and DVCAM tapes. It removes common noise and distortions, enhances motion smoothness and image clarity, and automatically increases resolution while making the video smoother by doubling the frame rate. With this model, users can effectively restore and enhance old digital video footage, making it suitable for viewing on modern devices.
- Dione Interlaced Robust Dehalo
This model helps clean up old videos by removing unwanted visual artifacts, such as banding and halos around objects. It works well with videos in 480i, 576i, 720i, and 1080i formats, processing them to improve their quality.
- Dione Interlaced TV
This model is designed to process and enhance old television, VHS, and other analog video recordings. It effectively removes artifacts, restores image detail, and reduces noise. The latest versions of the model provide higher-quality processing of complex and noisy video footage.
- Dione Interlaced Dehalo
A model designed to restore and enhance the quality of old videos affected by halo artifacts. Its primary use case is analog TV footage and VHS recordings. It is especially useful when the video contains defects typical of older sources, which other AI models tend to handle less effectively.
- Proteus
A versatile video processing model that serves as a more flexible alternative to Artemis. It is optimal for cases where a single video contains multiple types of distortions, such as noise, posterization, and halo artifacts. It effectively enhances image consistency both during upscaling and when processing at the original resolution (1×).
- Gaia Computer Graphics v5
A model optimized for animation. It preserves smooth color fills and crisp lines without excessive edge enhancement. Suitable for both upscaling and subtle enhancement of drawn or synthetic visuals.
- Gaia High Quality v5
Optimized for clean HD footage with minimal distortions. Smoothly reduces banding and aliasing artifacts, enhances fine details, and delivers a natural, well-balanced result at any upscale level, including up to 4K.
- Iris
Optimized for use with portraits. This model effectively restores faces in old or heavily compressed videos, eliminating flicker and restoring clarity to the eyes and mouth. It is recommended to apply this during the initial processing stage, before enhancement or upscaling, to ensure that faces remain clear and detailed.
- Rhea
A model designed to add micro-details to clean or preprocessed source footage at 720–1080p resolution. It is often used as a second pass following Artemis or Proteus — it helps “bring out” the texture of fabrics, hair, and fine surfaces, enhancing natural detail without introducing artifacts.
- Rhea XL
A model variant optimized for exactly 4x upscaling. It is particularly effective for upscaling, for example, from SD/DVD to 2160p. At other scaling factors, performance decreases noticeably.
- Theia Fine Tune Detail v3
This model is primarily designed to enhance and preserve fine image details, such as textures, lines, and small objects, making it particularly useful for processing archival or low-quality video footage. Unlike the similar Theia Fine Tune Fidelity model, the main goal of Detail v3 is to emphasize details, whereas Fidelity focuses on ensuring smoothness and image integrity without excessive sharpness.
- Theia Fine Tune Fidelity v4
This model is designed to deliver the most natural color and image reproduction, focusing on preserving the original appearance of the video during upscaling or quality restoration.
- Nyx
A model for suppressing heavy noise and film grain, especially in shadows and at high ISO settings. It works correctly only in the non-upscaled mode (Upscale - original): it first cleans up the images, preparing them for subsequent upscaling or leaving them at their original resolution.
- Nyx Fast
Unlike the standard Nyx model, the Nyx Fast version does not aim to add excessive detail or increase the sharpness of the video. Instead, it carefully removes defects while preserving the original, natural look of the image. It is ideal for processing footage with moderate compression levels, where subtle, barely noticeable improvements are needed without excessive sharpness or distracting details.
Add Noise
This function adds visual noise — grain or interference — to the video. The value ranges from 0 to 100, with higher values introducing more noise to the uploaded footage.
The “Add Noise” Function is Used For:
- Stylization — creates the effect of old film, VHS, or retro video.
- Hiding Defects — masks artifacts and low-quality footage.
Before:
After:
Focus Fix
A function that automatically corrects blurry video when the focus was off during recording. The available settings are: On, Normal, and Strong.
In Normal mode, the function performs moderate focus correction. In Strong mode, it applies maximum focus correction. Its purposes include:
- Sharpening - enhances the clarity of objects that appear slightly blurred.
- Correcting recording errors - fixes cases where the camera accidentally focused on the wrong subject.
- Automatic adjustment - especially useful for smartphones and action cameras during handheld or on-the-move shooting.
- Improved viewing experience - makes the video look more polished and professional.
When to Use:
- The video turned out slightly blurry.
- Autofocus did not work properly.
- Objects in the frame lost sharpness due to camera movement.
If the video is heavily out of focus, this function will not help. However, with slight focus shifts, it can noticeably improve quality.
Before:
After:
Grain
An effect that adds a characteristic grainy “noise” overlay to simulate film. It is used not to enhance sharpness, but for visual style and atmosphere.
Essentially, it serves the same purpose as the Add Noise function, but without precise control over the amount of grain. Only two options are available: On and Off. The final result depends on the neural network’s processing.
Fix Compression
This function is designed to improve image quality degraded by heavy compression. It removes artifacts that appear after saving a video at low bitrates or uploading it to platforms that recompress videos, such as social media.
The value ranges from -100 to 100. Lower values are suitable for lightly compressed videos and help preserve a natural look. Higher values are used when the video is heavily affected by issues such as blurriness, blockiness, or broken shadows and requires more aggressive restoration.It works best on moderately compressed footage.
Why you need it:
- Compression artifact removal - eliminates blurring, pixelation, and jagged edges.
- Detail restoration - makes textures, faces, and other elements more clear and readable.
- Post-export optimization - useful if the video was saved with a loss of quality.
Before:
After:
Improve Detail
This feature is designed to enhance the clarity and visual impact of your video by restoring fine textures, edges, and visual details that may have been lost due to compression, blur, or poor filming conditions. The value of this parameter ranges from -100 to 100. Negative values create a smoother visual result by softening sharp edges. Increasing the value enhances detail, making fine image elements clearer.
What it does:
- Enhances fine textures such as skin, hair, fabric, and background objects.
- Increases visual sharpness without making the image look over-sharpened.
When to use it:
- The video appears blurry or too soft.
- Textural details are lost due to low lighting, compression, or defocus.
- You need to make the image clearer and more readable, especially for close-ups or objects with important details.
Before:
After (Value +100 ):
❗️Important:
Setting the value too high may introduce artificial noise.
It is best to use moderate values or combine it with other effects (e.g., noise reduction or compression correction).
Sharpen
This function makes the edges of objects and fine details appear sharper and more defined. It is not just a visual effect, but a way to make the image more visually readable, especially when sharpness has been lost due to filming conditions, compression, or scaling.
The value of this parameter ranges from -100 to 100. Negative values reduce visual sharpness, while higher values strengthen image detail, making video elements appear clearer and more defined.
What It Does:
- Enhances object contours.
- Makes fine details more noticeable (e.g., lines, edges, textures).
- Increases local contrast—bright areas become more vivid next to dark areas, and vice versa.
❗️Important:
Excessive sharpening can make the image look unnatural: halos may appear around objects, and noise can become more pronounced.
It is best to use moderate values, especially for low-quality or heavily compressed videos.
It is often combined with other effects, such as detail enhancement and noise reduction.
Before:
Value -100:
Value +100:
Reduce Noise
This function is used to improve image quality and reduce unwanted artifacts caused by factors such as poor lighting or video compression. It helps make the image cleaner and clearer, improving the overall viewing experience.
The parameter value can be adjusted from -100 to 100.
Negative values mean that noise reduction is disabled or applied with a reverse effect. In some cases, this may even make noise more visible.
0 is the default value: noise reduction is not applied, or the standard setting is used.
Values above 0 apply stronger noise reduction, which may result in some loss of detail. The image becomes smoother, but fine details may appear blurred.
❗️Important:
Excessive noise reduction can make the image look “plastic,” removing fine details and textures.
It is best combined with the Improve Detail or Sharpen functions to restore important details after noise reduction.
Dehalo
This feature helps remove halos - light or dark outlines that sometimes appear around objects in a video. These halos are often visible at the edges of sharp transitions (for example, between the sky and a building, or between text and the background).
The value of this parameter can range from -100 to +100.
❗️Important:
Excessive halo removal can make the image look “flat” and erase natural edges.
It is best applied after sharpening if halos appear as a result.
Works well in combination with noise reduction and detail correction.
Before:
Value -100:
Value +100:
Anti - alias / Deblur
This function is used to eliminate jagged edges (“stair-step” aliasing) on diagonal and curved lines, which often appear at low resolutions or after scaling. It also helps restore clarity to slightly blurred details caused by compression, camera movement, or poor upscaling.
❗️Important:
Excessive smoothing can make the image look blurry and remove fine details.
It is best combined with sharpening and dehalo functions to balance sharpness and softness.
Before:
Value -100:
Value +100:
Video Upload
Technical Requirements for Uploaded Video Materials:
- Video duration must not exceed 20 seconds.
- The uploaded file size must not exceed 20 MB.
- Supported video formats: MOV, MP4, MKV.
For example:
❗️Important:
The better the source material, the more striking the result; the poorer the source material, the more modest the effect - and the more essential it is to carefully combine different models.
How to quickly choose the right model for video processing
Experience shows that testing and comparing different options gives the best results: one model reduces noise, another enhances sharpness, and a third refines facial features or fine textures. That said, the difference between options is often only noticeable when comparing them side by side on a zoomed-in still frame.
The approach to using Topaz is straightforward: do not expect miracles from severely damaged source footage, try different models and processing sequences, and evaluate the results on paused frames at high magnification.
To better understand what each model is designed for and in what order it is best applied, use the brief guide below. It will help you avoid confusion and save time on unnecessary test renders.
- Video with standard defects and moderate noise: use the Artemis model. If the issues are varied and mixed, it is better to choose Proteus.
- Interlaced video: first apply the Dione Robust model. After that, perform additional upscaling or enhancement if necessary.
- High-quality video / clean HD footage: we recommend using the Gaia HQ model. Gaia CG is ideal for CGI content and animation.
- Adding pronounced fine details and textures: use the Rhea model. For fixed ×4 upscaling, use Rhea XL.
- Heavy digital noise in the frame: before the main video processing, use the Nyx model for high-quality noise reduction.
- Portraits with blur and flickering facial details: the Iris model is optimal before subsequent upscaling.
- Light final sharpening and removal of visible compression blocks: the Theia model is the ideal choice.

We sincerely hope this guide helps you better understand and effectively use the Topaz AI tool. We did our best to make the process as simple and intuitive as possible.
Remember: every mistake is a step toward success. If something doesn’t work the first time, don’t get discouraged. Experiment, learn, and you’re sure to achieve the results you want. 💛
SYNTX AI: Syntx AI
SYNTX Support: Syntx Support
YouTube channel “SYNTX”: Syntx YouTube
SYNTX.AI Academy: SYNTX Academy